The site for writers of all genre, and the readers who love them. Find what you want to know.
Navigating In Your Novel
Your New Best Friend, The Document Map
by Susan Gillett Domokos
You’re sitting in your chair, estranged from the rest of the household. (Not because you can’t stand the normal noise of your family, i.e. bellowing partner, screaming kids, blaring television, etc., but because they can’t stand the oddly vacant, zombie-like look that pervades your face every time you sit down to prove to the world that you’re a literary genius, and have therefore shoved you off into a nicely made up broom closet, with a single yellowed bulb swaying gently above your head, to be CREATIVE…)
Yes, there you sit. All alone. Plot twists you thought of at 3 a.m. in the morning taking the next train to Albuquerque (or worse, boarding the space shuttle for exploratory missions to the farthest reaches of the universe). You’re just wishing for a friendly interrogation or something, so you can actually get some thoughts in your head, other than all the stuff you need to do before tomorrow morning, the unfolded linen in front of you, or that your thighs are too fat.
Welcome to the life of a writer
If you HAVE chosen this solitary, yet strangely excruciating life, you need all the help you can get. So apart from doing your online grammar classes (what’s a preposition again?) here’s some not-to-be missed information and guidance on a wonderful feature in Microsoft Word, that promises to make booting around your lengthy manuscript (yes, yours) a dream.
I’m talking about the Document Map.
This is a feature that will enable you to navigate to any spot in your manuscript instantly. Even if you have a manuscript of a thousand pages, (Ha!) you will stay organized and be able to locate whatever section or passage you want. When you consider the alternative of scrolling through reams of pages, you’ll see the value in removing that frustration (at least) and getting on with the business of BEING CREATIVE.
So let’s get on to it.
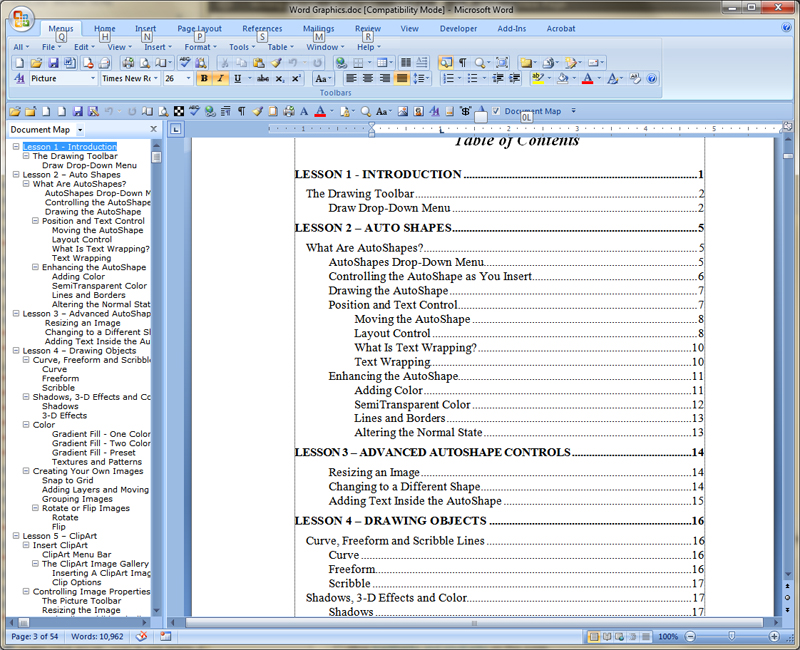
What will I see on the screen when I use the Document Map?
When you utilize the document map, you will see two columns on your screen. On the left hand side will be a narrow column with the first words from different headings in your manuscript appearing in it. This is the “map” area. On the right side, the wide column, will be your document. These two columns can move independently of each other.
Where to start?
- In the Ribbon, got to the VIEW menu.
- Select Navigation from the SHOW options.
Start in your open document. Click the Document Map icon. (This icon looks like a magnifying glass on top of a Word document/form with a blue bar on top. It’s usually found by default on the standard toolbar (file, edit etc.) beside thes how/hide and the zoom box [100%, etc.]) If you move your cursor over the icons and wait a couple of seconds, a screen tip will appear, saying “Document Map”. So far, so good. (Really, you knew you were brilliant…)
- What will happen?
As already mentioned, the headings in your document will show up on the left side of the screen. When you click on those, they are hyper-linked to the corresponding spots in your document. If you click on Lesson 2, voila! You’re immediately transported to that spot in your document. (Beam me over, Scotty!) Yay.
Now, all this is pretty simple. Right? And as a rule of thumb, just remember that Word shows what it considers the HEADINGS, or outline-level paragraphs in the Document Map. Yes, techy-talk I know, but what that really means to you is that sometimes Word will NOT show what you want it to show, and this is where you need to take control of the situation, and make it do so. (Enjoy the control…you won’t get that with your publisher, or agent…at least not for a long while!)
To do this, you will have to format the chapter headings in your document to show up, AND you can also choose to format particular bits, probably beginnings of scenes to also show up, so you can navigate also within the chapter. (Remember this is all about making it easy for yourself! You’re a writer, you should be using your time and creative genius to pen those magnificent masterpieces, or…. You’re a writer and you need all the help you can get. (Whichever statement works at the moment – take your pick.)
Soooo, to format the chapter headings, how do I start?
- Find the Style Menu in the Ribbon -To do this, you take advantage of another cool feature, and that’s the Style Feature. [Depending on your version of MS Word] The Style box is on the standard toolbar again, usually to the left of the font box. (Typically you see this displaying the word “Normal” inside it.) If you click the drop down arrow on the right of this box, a whole list appears under it. Those are your default styles included by Microsoft Office. Such as “Heading 1, Default Paragraph font” etc. (There are tons more default styles than those that show up. If you want to see the entire list, hit “shift”, then the drop down arrow on the style box, and use your “down” or “up” keys to scroll the entire list. And that’s before you make up your own!)
- Format the Headings – Once you’ve found the style box, here’s how to format your chapter headings: Select the heading in your article (i.e. “highlight” it). For our purposes, let’s say it says “Chapter One.”Click on click on the heading style [Heading 1 for your title, Heading 2 for your Chapter Title, Heading 3 for your Scene number].
The formatting or appearance will also have changed, so if you want, you can change heading back to proper Manuscript style, Select the heading again (i.e. “Chapter One”). Apply the desired font (Courier New, or whatever you use), center it, and change the font size to 12.
Now this will take care of your chapter headings. Easy. And now, they all show up within the Document Map, so you can hyperlink to any chapter you want instantly.
There is also a way to have the Document Map pick up subheadings within your chapter; ie. if you want it be able to immediately go to, say, a point of view change, without having to scroll through the whole chapter. Here’s the key. (Discovered by me on a Sunday morning that started out peaceful, went to raving lunacy as I tried to figure this out, then thankfully quieted down again.)
Say you want the beginning words of your paragraph “Gloria sighed as Adrian moved closer” to show up in the Document Map, and you figure if you select those words and format them to be heading 2, (the next level down) they will show up. HA! Fooled you! (Or rather Microsoft did…aren’t you used to it by now? :)) They won’t show up. Why? One of the vagaries of the document map I found is that you must select the whole paragraph for it to work. Every time you hit the enter key, Word considers that a paragraph, by the way. (So the words “Chapter One” are considered a paragraph, cause you hit “enter” after it.) Conversely, if you format the first 3 words of your paragraph to heading 2, Word will make the formatting changes to the first 3 words, but it will NOT show up in the document map. (Again, now that I’ve told you this, you will not have to waste a mindless hour and a half in front of the computer screen yelling, WHY? and pouting, but can apply that mindless hour to your plotting or editing or writing or being meaningful with your dh [dear husband] or whatever. So, here’s how to fix it.
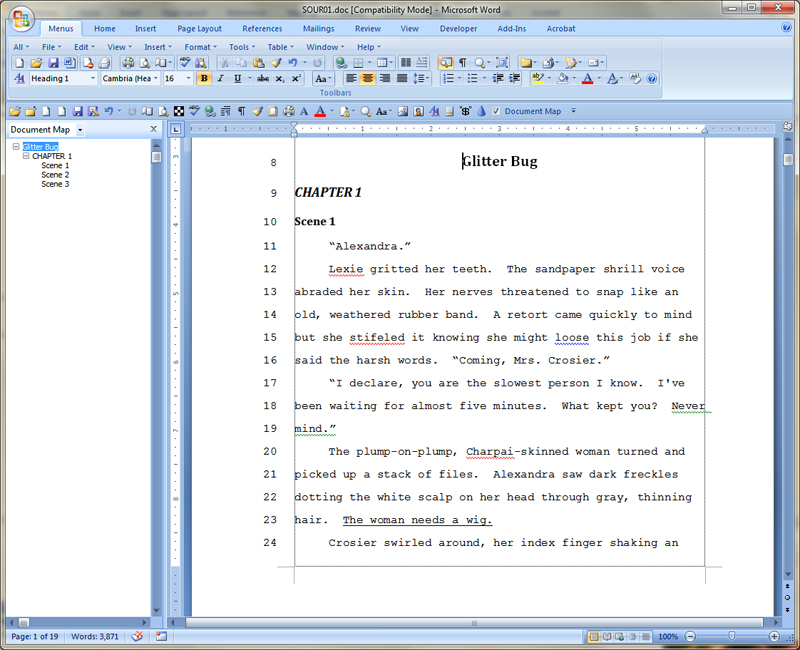
Format the bits within your chapter to show up in the Document Map
Pick a paragraph or a beginning of a scene of POV change, the first line of which you would like to show up in the document map.
Select the whole paragraph. (“Highlight” it)
Click on the drop down arrow of the style box, and hit “Heading two”.
All done! Now the first few words of the paragraph will show up under Chapter X, in your Document Map. That’s great, but this has most likely changed the appearance of your paragraph too. And while it may look kind of cool, and funky, if you want the ms to look all neat and proper, you can then change the font etc. to your desired MS formatting. In other words,
Select (highlight) the paragraph again, and just change the font etc back to what you are using for the rest of the article.
Your bits will now show up in the document map, meaning you can immediately boot to those areas. Yay!
One last tidbit for all of you smart writers, if you’re interested. What if you don’t want to have to do the last step above, but just want the formatting to be what you want as soon as you apply the heading style? Well, how about creating a “style” of your own, so instead of clicking “Heading Two”, you click your own personal style, and it’s done?
To Create Your Own “Style”
[This is not recommended for manuals you submit electronically as publisher’s will not have your personally created styles available to them and it’s very frustrating to have to change styles in a manual — you don’t want to make them mad at you before they even get started. – Deanna Lilly]Go the Format menu, and pick “Style” – (the “Style” dialog box pops up).Then pick “New” – (the “New Style” dialog box pops up)
For “Name”, type a name you’ve chosen (I used Heading 2 MS), and,
It must say use the word ‘Heading’ as part of the style name, if you want it to show up in the Document Map.
It must also be a bit different than “Heading 2” or you’ll lose the default Word “Heading 2” one.)
For “Based on”, it can say “Heading 2”. “Style type” – should say “Paragraph”, then hit” Format” at the bottom of the dialog box.
Go to “Font”, make the desired changes, Hit “OK.”
Then, going back to “Format” at the bottom of the dialog box again, go to “Paragraph”, and make the desired changes (if you are writing an MS, you may be already using .3 as indentation, line spacing as ‘exactly’ 25 pt, etc. – just do what you are already using), and hit “OK” (this step is optional).
You’ll now be back at the “New Style” dialog box, and here MAKE SURE you check the box at the bottom that says “Add to template” (which means it will always be available for you in all your documents) before you leave this box.
Hit “Ok” in the “New Style” dialog box.
Hit “Close” in the “Style” dialog box.
Yay! (Check to see your new style listed in the Style box.)
Simply apply this style next time to your ENTIRE PARAGRAPH, and it will keep your normal manuscript formatting, but still show up as a “Heading Two” in the document map. Yay again!
If you need to, don’t forget you can right-click anywhere in the Document Map area, and select how many levels you want showing. And you’ll also get + boxes and – boxes beside your headings in the Document Map to expand the contents under “Chapter One” or collapse them. Lots of fun!
One last tip…Can’t help myself…. to select an entire paragraph within your document, just put your insertion point inside the paragraph, and triple click. Voila! All selected.
Hope this helps, all you fellow writers. Microsoft Word can be one of a writer’s best friends, and make life much simpler. And don’t forget, while you’re manipulating the software unmercifully, that you’re a pretty admirable person – lots of people SAY they want to write, or KNOW they could…but you’re one of the few that is actually taking the bull by the horns, and doing it!…with all it’s attendant learning curves in so many areas.
Till next time,
Sue Gillett
Ps. If you liked this article, send chocolate and masseuses who love what they do.

AGENTS & EDITORS
- Agents: Knowing When To Hold One and When To Fold
- Copyright Primer, Know Your Rights
- Getting Offers from Multiple Literary Agents
- Landing An Agent Elements Of A Winning Query
- Literary Agents List
- Preditors and Editors
- Publishing, Writing Terms, Acronyms
- Tips for a Successful Editor Appointment
- Want More? Here’s How to Get It
- What NOT to Do When Beginning Your Novel
- Windup for the (Story) Pitch
CALLS FOR SUBMISSIONS
![]()
CALLS FOR SUBMISSIONS MAIN PAGE
- 2026 JUL Calls for Submissions
- 2026 JUN Calls for Submissions
- 2026 MAY Calls for Submissions
- 2026 APR Calls for Submissions
- 2026 MAR Calls for Submissions
- 2026 FEB Calls for Submissions
- 2026 JAN Calls for Submissions
- 2025 DEC Calls for Submissions
- 2025 NOV Calls for Submissions
- 2025 OCT Calls for Submissions
- 2025 SEP Calls for Submission
- 2025 AUG Calls for Submission
COMPUTER TIPS
- ASCII Characters
- Building Your Web Site and Doing It Right
- Don’t Be a Victim-Scams, Identity Theft, Urban Legends
- Don’t Spread Scams
- Free AI Tools That Can Be Used In Business Writing
- How to Annoy Your Website Visitors
- If Your Data Is Compromised
- Internet Safety: Guide to Keep Your Information Safe Online
- Knowing Your Target Audience
- Online Safety for Kids and Teens
- Stopping Viruses from Propagating Through Your Email
- The Top 10 Email Errors
- Word Processors Through Time: Before MS Word & Google Docs
GRAMMAR & FORMATTING
![]()
GRAMMAR & FORMATTING MAIN PAGE
- Achieving 250 Words / 25 Lines Per Page
- And Sammy, Too? Oh, No!
- Changing Double Hyphens to EM Dashes in Word
- Edit Easier
- High Hopes–Avoiding Common Mistakes
- Misused Words
- Navigating In Your Novel
- Proofreaders Marks
- Research Links
- Rules for Writers
- Slang and Jargon Souces
- Tightening Your Manuscript and Trimming the Word Count
INSPIRATION-& MOTIVATION
![]()
INSPIRATION & MOTIVATION MAIN PAGE
- A Dream Realized
- Beyond the Basics
- Dumb Little Writing Tricks That Work
- Finding Time to Write
- Five Ways to Promote Yourself
- How Not to Procrastinate
- How to Quit Writing and End up on the Bestseller Lists
- Ideas Escape Me
- Keeping an Idea Book
- Love to Write: Here Is How You Can Build Your Career
- Making Time for Self-Care While Running a Business
- Moving Up the Rejection Ladder
- Pop Quiz: Who Are You?
- Rules for Writers
- The 8 Habits of Highly Successful Young-Adult Fiction Authors
- The Art of Being Rejected–475 Words
- The Juggling Act
- The Literary Food Chain
- Various Types of Writing for Young Writers
- Why Article Writing Should Be A Part Of Your Career Development Strategy
- Write Better Naked
- Writer’s Conferences Do You Really Need To Attend?
- Writing By Moonlight
MARKETS & JOBS
- 35 Online Work Ideas to Earn Good Money Whilst Studying
- An Interview with Holly Ambrose
- Copyright Primer, Know Your Rights
- EBooks-Fears to Possibilities
- Finding Markets Fiction and Nonfiction
- Freelance Writing 101
- Getting Offers from Multiple Literary Agents
- How To Be a (Shiver) Reporter
- How To Market Your Book After You’ve Written It
- How to Write a Novel Synopsis
- Love to Write: Here Is How You Can Build Your Career
- Magazine Links
- Making Money As a Corporate Freelancer
- Market News–All Genres
- Need a Clip? Open a Newspaper
- Newspaper Writing Resources
- Path to Self-Publishing Success
- Publishing, Writing Terms, Acronyms
- Science & Science Fiction Writing Organizations
- Selling to Children’s Markets
- Submission Tracking
- Submitting to UK Markets
- Syndication 101
- To Specialize, or Not to Specialize?
- Ultimate Guide to Being a Freelancer 2026 Update
- What Are Your Chances of Getting Published?
- Why Article Writing Should Be A Part Of Your Career Development Strategy
- Why E-Books?
- Words That Pay-The Rewards Of Choosing Writing As A Job
- Write Your Way to $1000 a Month
- Writing Groups List
- Youth Writing Markets
ONLINE SAFETY
PUBLISHING
- Agents: Knowing When To Hold One and When To Fold
- Copyright Primer, Know Your Rights
- Getting Offers from Multiple Literary Agents
- How To Market Your Book After You’ve Written It
- How to Write a Novel Synopsis
- Landing An Agent Elements Of A Winning Query
- Love to Write: Here Is How You Can Build Your Career
- Making Money As a Corporate Freelancer
- Navigating In Your Novel
- Path to Self-Publishing Success
- Publisher’s Websites
- Publishing, Writing Terms, Acronyms
- Rules for Writers
- Science & Science Fiction Writing Organizations
- Submission Tracking
- Syndication 101
- The Great Limbo Mystery Question
- Tightening Your Manuscript and Trimming the Word Count
- What Are Your Chances of Getting Published?
- Why Article Writing Should Be A Part Of Your Career Development Strategy
- Why E-Books?
WORKSHOPS & CONFERENCES
WRITER'S LIFE
- A Dream Realized
- A Writers Dream-The Home Office
- Affirm All You Want
- Copyright Primer, Know Your Rights
- Finding Time to Write
- Finding Your Writing Compass: A Guide to Freelance Adventures
- How To Be a (Shiver) Reporter
- How To Write Your Own Press Releases
- Keep a Clipping File
- Keeping an Idea Book
- Love to Write: Here Is How You Can Build Your Career
- Making Time for Self-Care While Running a Business
- Mommy’s Muse
- Moving Mountains
- Mud Pies
- Pop Quiz: Who Are You?
- Teach Yourself to Write
- The 8 Habits of Highly Successful Young-Adult Fiction Authors
- The Art of Procrastination
- Various Types of Writing for Young Writers
- Working with a Critique Group
- Writer’s Conferences Do You Really Need To Attend?
- Writing Conferences-Educating and Inspiring
WRITING CONTESTS
![]()
ABOUT WRITING CONTESTS
- A Guide to Assessing Writing Contests
- Writer’s Conferences Do You Really Need To Attend?
- Writing Groups List
- 2026 JUL Writing Contests
- 2026 JUN Writing Contests
- 2026 MAY Writing Contests
- 2026 APR Writing Contests
- 2026 MAR Writing Contests
- 2026 FEB Writing Contests
- 2026 JAN Writing Contests
- 2025 DEC Writing Contests
- 2025 NOV Writing Contests
- 2025 OCT Writing Contests
- 2025 SEP Writing Contests
- 2025 AUG Writing Contests
WRITING TOOLS & APPS
![]()
WRITING TOOLS & APPS MAIN PAGE
- And Sammy, Too? Oh, No!
- Beyond the Basics
- Changing Double Hyphens to EM Dashes in Word
- Dumb Little Writing Tricks That Work
- Finding Your Writing Compass: A Guide to Freelance Adventures
- Free AI Tools That Can Be Used In Business Writing
- Helpful Books
- High Hopes–Avoiding Common Mistakes
- Ideas Escape Me
- Knowing Your Target Audience
- Magazine Links
- Misused Words
- Path to Self-Publishing Success
- Pop Quiz: Who Are You?
- Reconsider Hand Writing
- Research Links
- Slang and Jargon Souces
- The 8 Habits of Highly Successful Young-Adult Fiction Authors
- Unblocking Your Muze
- Various Types of Writing for Young Writers
- What NOT to Do When Beginning Your Novel
- Why Article Writing Should Be A Part Of Your Career Development Strategy
- Word Processors Through Time: Before MS Word & Google Docs
- Working with a Critique Group
- Writing Groups List
- You Can Write A Short Story: Part 1 The Story Idea
- You Can Write A Short Story: Part 2 The Meat of the Story
- You Can Write A Short Story: Part 3 The Climax


Subscribe

Author Ads
Business Ads
Business Ad
